

PART 1: INSPECTION BEFORE INSTALLATION
1. Ring die Inspection Before Installation
Whether the working surface is even.
Whether the groove is worn, and whether the threaded hole is broken.
Whether Dia hole and Compression ratio correct
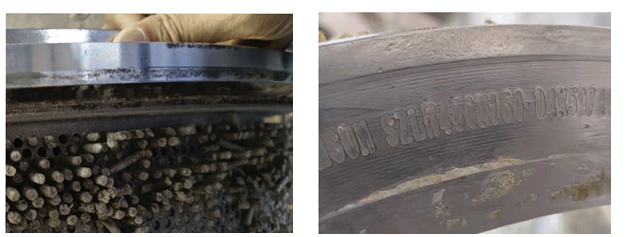
Whether there are dent or wear marks on the hoop and tapered surface, as shown in figure 1 and 2.
2. Roller Inspection Before Installation
Whether the component rotation is normal
Whether the edge of the roller is worn
Whether the tooth shape is complete
3. Check the wear condition of the hoop, and replace the ineffective hoop in time
4. Check the wear of the mounting surface of the drive rim, and replace the failed drive rim in time
5. Check and adjust the angle of the scraper to avoid uneven spread of material
6. Whether the installation hole of the feeding cone is damaged or not
PART 2: REQUIREMENTS FOR RING DIE INSTALLATION
1. Tighten all nuts and bolts symmetrically to the required torque
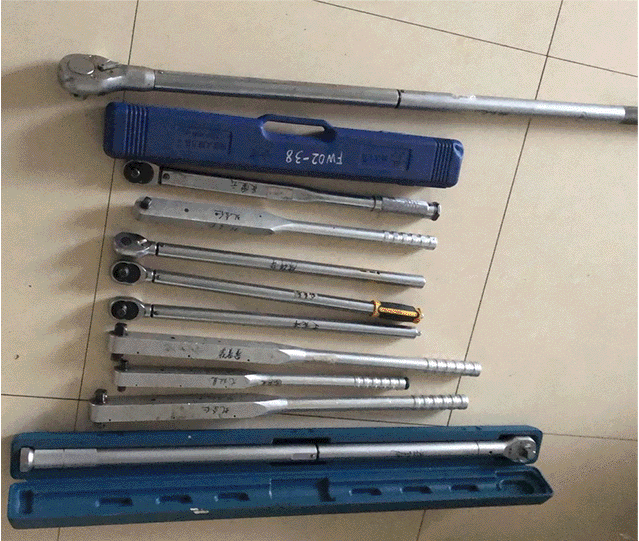
-SZ LH SSOX 1 70 (600 model) as an example, the ring die locking torque is 30 0 N. m, Fengshang-SZ LH535 X1 90 granulator holding box bolt tightening torque 470N.m), torque wrench as shown in Figure 3; when the cone ring die is installed, the end face of the ring die should be kept within 0.20 mm, as shown in Figure 4.

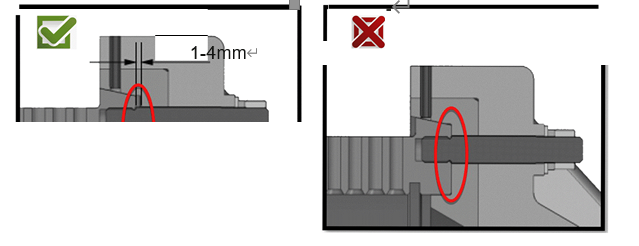
2. When the cone ring die is installed, the clearance between the end face of the ring die and the end face of the drive wheel flange is 1-4mm, as shown in Figure 5, if the clearance is too small or there is no clearance, the drive rim must be replaced, otherwise the fastening bolts may be broken or the ring die may be broken.
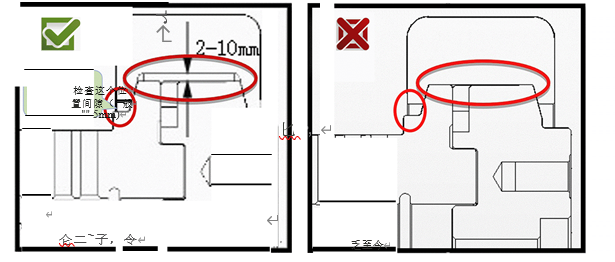
3. When installing the hoop ring die, lock all nuts and bolts symmetrically according to the required torque, and ensure that the gaps between each holding box are equal during the locking process. Use a feeler gauge to measure the gap between the inner bottom surface of the holding box and the outer surface of the ring die holding box (usually 2-10mm). As shown in Figure 6, if the gap is too small or there is no gap, the holding box must be replaced.
4. The die rolling gap should be between 0.1-0.3 mm, and the adjustment can be done by visual inspection. When the ring die rotates, it is better that the rolling is not rotating. When a new die is used, especially when a ring die with a small die hole is used, the die rolling gap is usually increased to complete the running-in period of the die rolling and avoid the calendering phenomenon of the ring die bell mouth.
5. After the ring die is installed, check whether the roller is edge-pressed
PART 3: RING DIE STORAGE AND MAINTENANCE
1. The ring die must be stored in a dry and clean place and marked with specifications.
2. For the ring die that is not used for a long time, it is recommended to coat the surface with a layer of anti-rust oil.
3. If the die hole of the ring die is blocked by the material, please use the method of oil immersion or cooking to soften the material, and then re-granulate.
4. When the ring die is stored for more than 6 months, the oil inside needs to be filled.
5. After the ring die has been used for a certain period of time, regularly check whether there are local protrusions on the inner surface of the ring die, and check whether the die hole guide port is ground, sealed or turned inward, as shown in Figure 8. If found, the ring die is repaired to prolong the service life, as shown in Figure 9. When repairing, it should be noted that the lowest part of the working inner surface of the ring die should be 2 mm above the bottom of the overtravel groove, and there is still an adjustment allowance for the rolling eccentric shaft after the repair.